
Standard SSL Certificates for Intranets (Windows/IIS Guide) Full browser trust for a single internal hostname
A standard SSL certificate is the simplest way to secure a single internal hostname with HTTPS. Unlike self-signed certificates, it's issued by a trusted certificate authority (CA) and won't trigger browser warnings. This guide shows you how to purchase, validate, and install one in IIS.
Standard SSL certificates are the simplest way to secure a single internal hostname, and they're essential for meeting compliance and audit-ready requirements for banks and credit unions. Need to cover multiple hostnames or find a free option? See our guides on wildcard SSL and self-signed certificates.
What You'll Need
- An internal hostname using a standard TLD (e.g., intranet.example.com)
- Access to your domain's DNS records for validation
- Admin access to your intranet server (Windows + IIS)
Step-by-Step: Installing in IIS
First you'll need to choose a Certificate Authority (CA) - select a trusted CA like DigiCert, Sectigo, or GoDaddy. Confirm they support internal domains if your hostname isn't public.
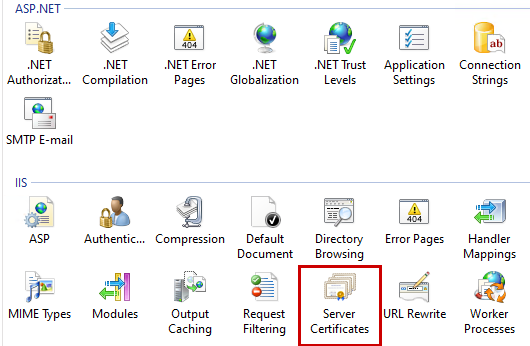
- Open IIS (Internet Information Services) on your server.
- Navigate to Server Certificates
In the left pane, expand the SERVERNAME, and then 'Sites'. Click the affected site, then - in the middle pane - doubleclick the 'Server Certificates' icon.
- Generate a Certificate Signing Request (CSR)
In the right pane, click 'Create Certificate Request...'; this will display a form that needs to be filled out completely.⚠ The Common Name must match the exact hostname users will type (e.g., intranet.simplifyit.com). If it doesn't, browsers will display a certificate mismatch error and you'll have to redo the process.
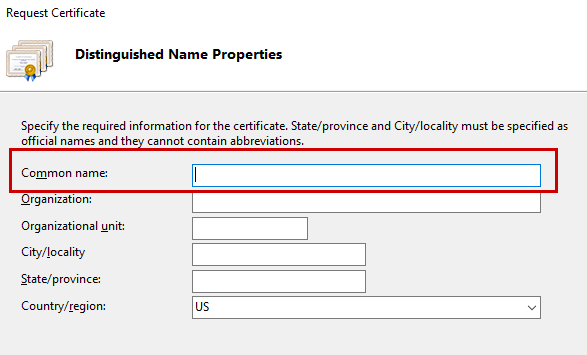
Click the 'Next' button, and save the resulting string in Notepad (or similar). You'll need it later.
- Submit the CSR
Your certificate authority will provide instructions - but this step is often misunderstood. You'll use the string generated earlier to generate the certificate that will be downloaded. With GoDaddy, for instance, it's just a textbox that you paste into.
- Validate Ownership
If your registrar and SSL provider is one in the same, then you likely won't have to validate ownership of the domain. But if you, just following the instructions (either a DNS record, or a simple txt file pasted in the root of the external domain site).
- Download Your Certificate Files
Once issued, follow instructions from your CA to download the certificate file (often a zip that includes a .crt or .p7b file).
- Install the SSL Certificate in IIS
- Back in IIS on the server - click the 'Complete Certificate Request...' in the far right Actions pane. select the certificate file.
- File Name: Click ... and browse to the .crt or .cer file you extracted from the ZIP.
- Friendly Name: Enter a name that will help you recognize this certificate later (e.g., 'Intranet SSL - Exp [Date]').
- Certificate Store: Typically, the default store (Personal) is used.
- Click OK to install the certificate.
- Bind the Certificate to HTTPS
- In the far right Actions page, click 'Bindings...'
- Click the 'Add...' button.
- For type, select 'https'; the port should change to 443 (the default).
- In the 'Host name' field, enter the same value as the Common Name from above (for example, intranet.simplifyit.com).
- If the name of the internal server doesn't match the cert's url, for instance - server name is serverint-01, but the FQDN is intranet.simplifyit.com - then you'll need to add a DNS record to match (just the FQDN and the IP of this server).
- In the 'SSL Certificate' dropdown, select the SSL certificate you just created.
- There's a checkbox for 'Require Server Name Identification'; check that box if you have multiple sites and multiple SSL certificates.
- Redirect HTTP to HTTPS
Use IIS URL Rewrite to force all users onto HTTPS (see sample rules below).